Image editing has revolutionized the way we capture and present our world. With just a few clicks, you can transform a simple snapshot into a stunning visual masterpiece. However, it’s easy to make mistakes that can turn your creative efforts into something cringe-worthy. Here’s a detailed look at some of the most common image editing blunders and how to avoid them to ensure your photos look their best.
1. Overdoing Saturation and Vibrance
One of the most frequent mistakes in image editing is overdoing the saturation and vibrance. These sliders are tempting because they make colors stand out, but cranking them up too high can result in an unnatural, garish look. The image may end up looking like a neon sign rather than a beautifully edited photo.


How to Avoid This Mistake:
Instead of pushing saturation and vibrance to their limits, make subtle adjustments. Aim for a slight increase that enhances the image without overwhelming it. For more precise control, use the color mixer panel to adjust specific color tones individually.
The calibration panel offers additional sliders to fine-tune color saturation and hues in a targeted manner. Another technique is to use split toning, where you can boost colors in highlights, midtones, and shadows separately. This method allows you to enhance key areas of the image without making it look overly processed.
2. Ignoring Proper Exposure Adjustments
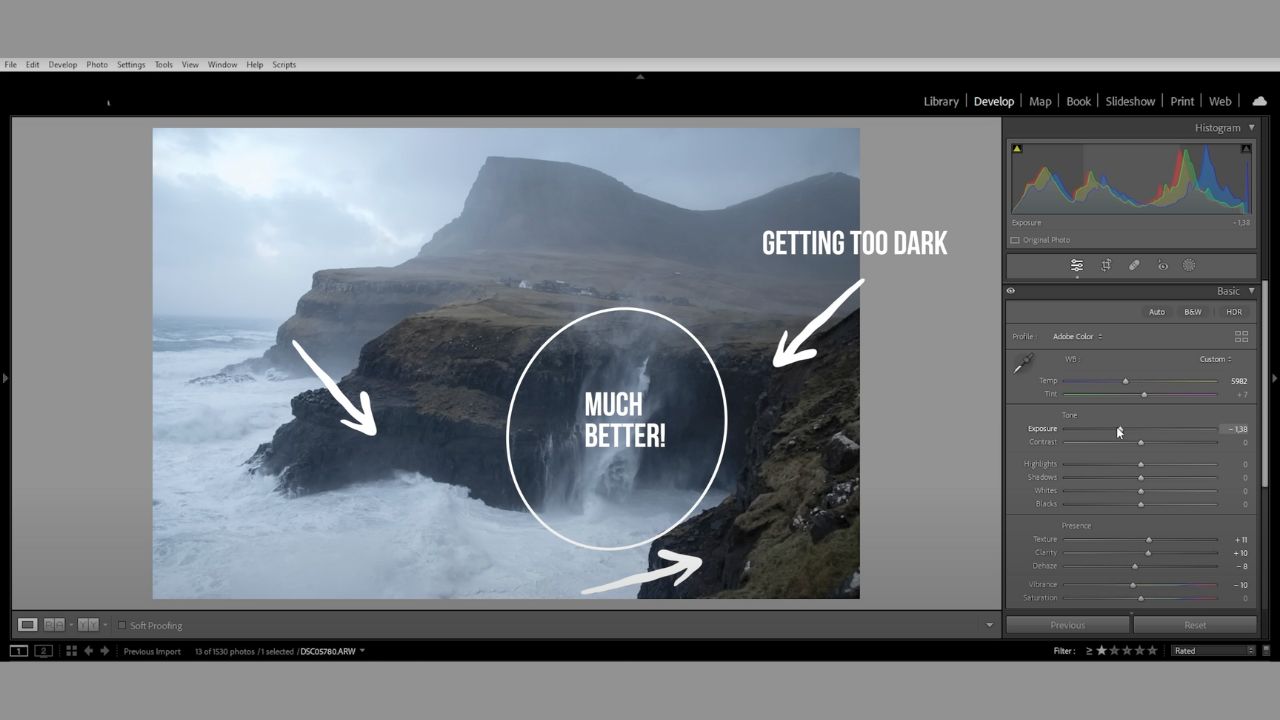
Exposure issues are common in photography. If your image is too bright or too dark, the instinct might be to adjust the exposure slider drastically. While this might correct the brightness, it can lead to other problems, such as loss of detail in shadows or highlights, resulting in an imbalanced image.

How to Avoid This Mistake:
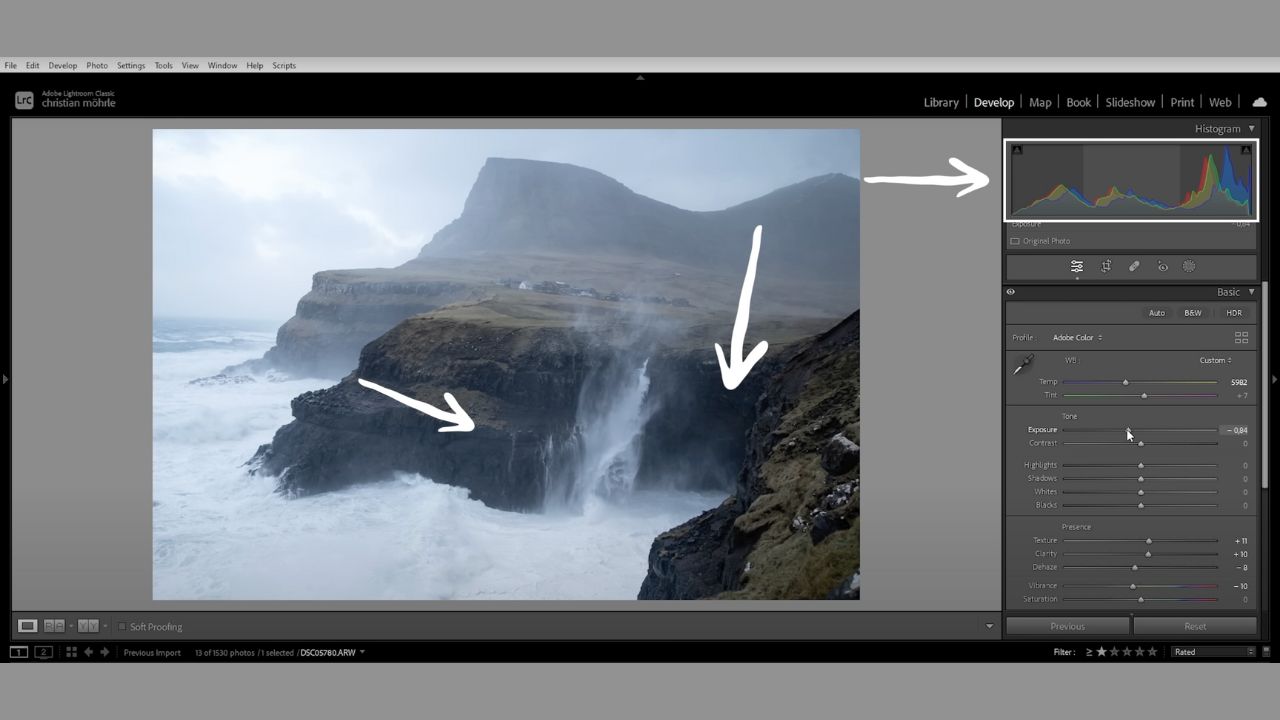
To correct exposure without compromising other parts of the image, make small, incremental adjustments to the exposure slider. Monitor the histogram to ensure you’re not clipping details in the darkest or brightest areas.
If the image remains too bright after lowering the exposure, use the highlights and white sliders to recover details in the bright areas without making shadows too dark. Conversely, if brightening a dark image, start by raising the exposure slightly and then adjust the shadows and black sliders to bring out details in the darker parts while lowering highlights to prevent overexposure.
3. Relying Solely on the Contrast Slider
The contrast slider can add depth to your image by increasing the difference between light and dark areas. However, using it in isolation often leads to a loss of detail and an artificial look.


How to Avoid This Mistake:
Instead of relying solely on the contrast slider, manually adjust the highlights, whites, shadows, and blacks sliders. This approach allows for more nuanced control over different tonal ranges. By stretching the histogram in both directions—pushing the whites higher and the blacks lower—you can add contrast in a more controlled manner. The tone curve tool provides even more precise control for adjusting contrast. By manipulating the curve, you can target specific tonal ranges and enhance contrast without affecting the entire image.
4. Applying Global Adjustments to Everything
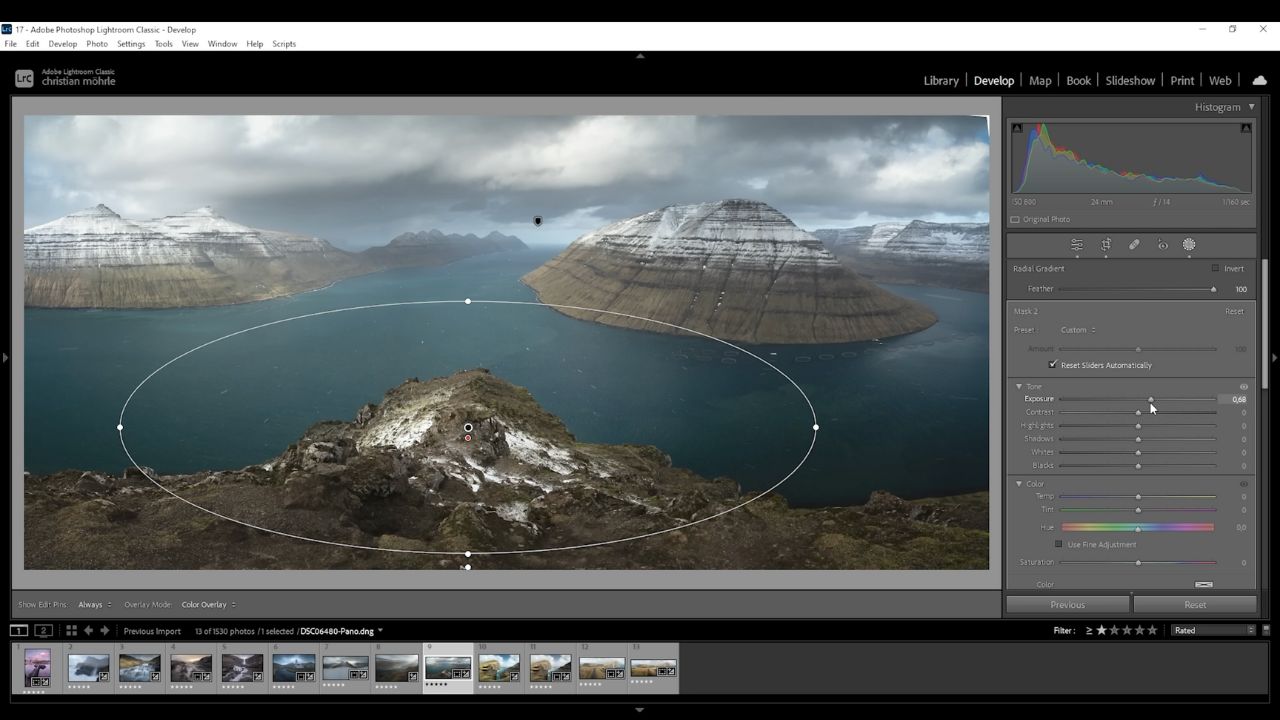
Editing software often features global adjustments, which affect the entire image uniformly. While this can be convenient, it’s not always the best approach, especially if different parts of the image require different adjustments.


How to Avoid This Mistake: Utilize local adjustments such as masks in Lightroom to apply changes to specific areas of your image. For example, you can use a linear gradient to enhance the sky or brighten the foreground without altering the rest of the photo. Lightroom offers advanced masking options that allow you to select specific subjects, backgrounds, or colors, enabling you to make targeted adjustments that enhance individual parts of your image while preserving the overall balance.
5. Overloading with Effects and Adjustments
When new to image editing, it’s tempting to experiment with every tool and effect available. However, this often results in over-edited images that look cluttered and artificial.

How to Avoid This Mistake: Before you begin editing, visualize the final look you want for your image. As you work, periodically step back and assess your progress.
If you find the image becoming too busy or distorted, consider reverting some changes or simplifying your adjustments. Sometimes, less is more, and subtlety often leads to more polished results. Take breaks between editing sessions to ensure you’re not overdoing it and maintain a clear perspective on the outcome you aim to achieve.
6. Editing in a Rush Hour
Immediate editing and uploading after a shoot can lead to mistakes and a lack of attention to detail. Rushing the editing process often results in subpar outcomes and missed opportunities for refinement.

How to Avoid This Mistake:
Allow yourself time between editing sessions. After making initial edits, take a break before revisiting the image. This break helps you view the image with fresh eyes, making it easier to spot areas that need adjustment or improvement. By reviewing your edits after some time, you can make more thoughtful and refined decisions. This approach not only improves the quality of your edits but also helps you avoid the pitfalls of hasty work.
7. Imitating Styles That Don’t Suit Your Image
Attempting to apply a specific editing style to an image that doesn’t match the original conditions often leads to disappointing results. For instance, applying a moody, dramatic preset to a bright, daytime photo usually falls flat.

How to Avoid This Mistake: Ensure that the base image aligns with the style you want to achieve. For example, if you’re aiming to replicate a moody landscape style, start with a landscape shot taken during the right time of day and under appropriate lighting conditions. Match the style to the image’s inherent qualities rather than forcing a preset or style that doesn’t naturally fit the photo.
8. Over-reliance on Presets
Presets can be incredibly useful for streamlining your workflow, but depending on them too much can lead to one-size-fits-all results that don’t cater to the specifics of each photo.

How to Avoid This Mistake:
Use presets as a starting point rather than a final solution. Apply presets to get a basic look and then make additional adjustments to tailor the edits to your image. Creating your own presets with minor tweaks can offer a personalized touch and better results. Presets are great for consistent adjustments across similar images, but always refine them to fit the unique characteristics of each photo.
9. Neglecting Lens Corrections
Lens distortions such as vignetting and chromatic aberration can detract from the quality of an image. Many photographers overlook the lens correction tools available in their editing software.


How to Avoid This Mistake:
Modern editing tools, like Lightroom, offer lens correction panels that can automatically fix common issues. Enable these corrections to address problems like vignetting or chromatic aberration. For more severe issues, use advanced manual correction tools available in your software. By addressing these distortions, you can enhance the overall quality of your image and ensure it looks its best.
10. Avoiding Complex Tools
Advanced editing tools can be intimidating for beginners, leading many to avoid using them altogether. However, mastering these tools is crucial for achieving high-quality results.


How to Avoid This Mistake:
Don’t shy away from complex editing tools; instead, embrace them as opportunities to enhance your skills. Practice using tools like the tone curve, color grading tabs, and advanced masking options. Watch tutorials and seek out resources to better understand these features. With time and experience, you’ll find these tools become easier to use and will significantly improve your editing capabilities.
Conclusion
Avoiding these common image editing mistakes will help you create visually appealing and professionally polished photos. Remember, editing is both an art and a science, requiring practice and patience. By learning from these mistakes and refining your techniques, you’ll be able to produce stunning images that truly shine.
Feel free to share your own editing tips or ask questions in the comments below. Thank you for reading, and happy editing! Image2VectorGraphicsIndia!